
What is Spring Batch?
- A lightweight, comprehensive batch framework designed to enable the development of robust batch applications vital for the daily operations of enterprise systems.
- Spring Batch provides reusable functions that are essential in processing large volumes of records, including logging/tracing, transaction management, job processing statistics, job restart, skip, and resource management.
- It also provides more advanced technical services and features that will enable extremely high-volume and high-performance batch jobs through optimization and partitioning techniques.
- Simple as well as complex, high-volume batch jobs can leverage the framework in a highly scalable manner to process significant volumes of information.
Features
- Transaction management
- Chunk-based processing
- Declarative I/O
- Start/Stop/Restart
- Retry/Skip
- Web-based administration interface (Spring Batch Admin)
How to execute Spring Batch Manually?
- The Job Tier is responsible for the overall execution of a batch job.
- It sequentially executes batch steps, ensuring that all steps are in the correct state and all appropriate policies are enforced.
- The job tier is entirely concerned with maintaining the three job stereotypes: Job, JobInstance, and JobExecution.
- The JobLauncher interacts with the JobRepository in order to create a JobExecution, and the Job stores the JobExecution using the repository.
What is Job Repository?
- Job Repository is responsible for the persistence of batch meta-data entities.
- SimpleJobRepository is the implementation of JobRepository that stores JobInstances, JobExecutions, and StepExecutions using the injected DAOs.
- A FactoryBean (MapJobRepositoryFactoryBean) that automates the creation of a SimpleJobRepository using non-persistent in-memory DAO implementations.
- This repository is only really intended for use in testing and rapid prototyping. In such settings, you might find that ResourcelessTransactionManager is useful (as long as your business logic does not use a relational database).
- Not suited for use in multithreaded jobs with splits, although it should be safe to use in a multi-threaded step.
What is Job Launcher?
- Simple interface for controlling jobs, including possible ad-hoc executions, based on different runtime identifiers.
- It is extremely important to note that this interface makes absolutely no guarantees about whether or not calls to it are executed synchronously or asynchronously.
- A simple implementation of the JobLauncher interface. The Spring Core TaskExecutor interface is used to launch a Job.
- This means that the type of executor set is very important. If a SyncTaskExecutor is used, then the job will be processed within the same thread that called the launcher.
- Care should be taken to ensure any users of this class understand fully whether or not the implementation of TaskExecutor used will start tasks synchronously or asynchronously.
- The default setting uses asynchronous task executor. There is only one required dependency of this Launcher, a JobRepository. The JobRepository is used to obtain a valid JobExecution.
- The Repository must be used because the provided Job could be a restart of an existing JobInstance, and only the Repository can reliably recreate it.
What is Job Registry and Registry bean post processor?
- A runtime service registry interfaces for registering job configurations by name.
- MapJobRegistry is a Simple, thread-safe, map-based implementation of JobRegistry.
- A BeanPostProcessor that registers Job beans with a JobRegistry. Include a bean of this type along with your job configuration, and use the same JobRegistry as a JobLocator when you need to locate a Job to launch.
What is Tasklet in Spring?
- It is a strategy for processing in a step.
- Declares the implementation of the Tasklet strategy indirectly by configuring a chunk or directly by configuring a reference to the Tasklet interface.
- Given the current context in the form of a step contribution, do whatever is necessary to process this unit inside a transaction.
- Implementations return RepeatStatus.FINISHED if finished.
- If not they return RepeatStatus.CONTINUABLE. On failure throws an exception.
Let’s Implement
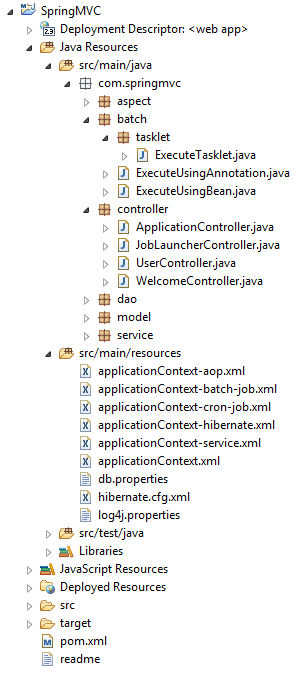
Project structure be like below image
pom.xml
<!-- Spring Batch dependency -->
<dependency>
      <groupId>org.springframework.batch</groupId>
      <artifactId>spring-batch-core</artifactId>
      <version>3.0.3.RELEASE</version>
</dependency>
applicationContext-batch-job.xml
<?xml version="1.0" encoding="UTF-8"?>
<beans xmlns="http://www.springframework.org/schema/beans"
      xmlns:batch="http://www.springframework.org/schema/batch"
      xmlns:task="http://www.springframework.org/schema/task"
      xmlns:xsi="http://www.w3.org/2001/XMLSchema-instance"
      xsi:schemaLocation="http://www.springframework.org/schema/beans
      http://www.springframework.org/schema/beans/spring-beans.xsd
      http://www.springframework.org/schema/task
      http://www.springframework.org/schema/task/spring-task.xsd
      http://www.springframework.org/schema/batch
      http://www.springframework.org/schema/batch/spring-batch.xsd">
      <bean id="transactionManager" class="org.springframework.batch.support.transaction.ResourcelessTransactionManager" />
      <bean id="jobRepository" class="org.springframework.batch.core.repository.support.MapJobRepositoryFactoryBean">
            <property name="transactionManager" ref="transactionManager" />
      </bean>
      <bean id="jobLauncher" class="org.springframework.batch.core.launch.support.SimpleJobLauncher">
            <property name="jobRepository" ref="jobRepository" />
      </bean>
      <bean id="jobRegistry" class="org.springframework.batch.core.configuration.support.MapJobRegistry" />
      <bean class="org.springframework.batch.core.configuration.support.JobRegistryBeanPostProcessor">
            <property name="jobRegistry" ref="jobRegistry" />
      </bean>
      <batch:job id="executeTasklet">
            <batch:step id="trackParamsRuleStep">
                  <batch:tasklet>
                        <bean class="com.springmvc.batch.tasklet.ExecuteTasklet">
                              <property name="params" ref="params" />
                        </bean>
                  </batch:tasklet>
            </batch:step>
      </batch:job>
      <bean id="params" class="java.util.HashMap" />
</beans>
JobLauncherController.java
package com.springmvc.controller;
import org.codehaus.jettison.json.JSONObject;
import org.springframework.batch.core.JobParametersBuilder;
import org.springframework.batch.core.configuration.JobRegistry;
import org.springframework.batch.core.launch.JobLauncher;
import org.springframework.beans.factory.annotation.Autowired;
import org.springframework.http.HttpStatus;
import org.springframework.http.MediaType;
import org.springframework.stereotype.Controller;
import org.springframework.web.bind.annotation.RequestBody;
import org.springframework.web.bind.annotation.RequestMapping;
import org.springframework.web.bind.annotation.RequestMethod;
import org.springframework.web.bind.annotation.ResponseStatus;
@Controller@RequestMapping(value = "/job")
public class JobLauncherController {
     private static final String TIME = "time";
     private static final String JOB_PARAM = "job";

     @Autowired
     private JobLauncher jobLauncher;
     @Autowired
     private JobRegistry jobRegistry;

     @RequestMapping(value = "/joblauncher", method = RequestMethod.POST, consumes = MediaType.APPLICATION_JSON_VALUE)
     @ResponseStatus(HttpStatus.ACCEPTED)
     public void launchJob(@RequestBody String info) throws Exception {
        JSONObject parseJson = new JSONObject(info);
        JobParametersBuilder builder = extractParameters(parseJson);
        jobLauncher.run(jobRegistry.getJob(parseJson.getString(JOB_PARAM)), builder.toJobParameters());
     }

     private JobParametersBuilder extractParameters(JSONObject parseJson) throws Exception {
          JobParametersBuilder builder = new JobParametersBuilder();
          builder.addLong(TIME, System.currentTimeMillis()).toJobParameters();
          builder.addString(JOB_PARAM, parseJson.getString(JOB_PARAM));
          return builder;
     }
}
ExecuteTasklet.java
package com.springmvc.batch.tasklet;
import java.util.Map;
import org.springframework.batch.core.StepContribution;
import org.springframework.batch.core.scope.context.ChunkContext;
import org.springframework.batch.core.step.tasklet.Tasklet;
import org.springframework.batch.repeat.RepeatStatus;
public class ExecuteTasklet implements Tasklet {
   private Map<Object,String> params;

   public Map<Object,String> getParams() {
      return params;
   }
   public void setParams(Map<Object,String> params) {
      this.params = params;
   }
   public RepeatStatus execute(StepContribution contribution, ChunkContext chunkContext) throws Exception {
      Map<?,?> jobParameters = chunkContext.getStepContext().getJobParameters(); params.clear();
      for (Map.Entry<?,?> entry : jobParameters.entrySet()) {
         params.put(entry.getKey(), entry.getValue().toString());
      }
      System.out.println("running job " + params);
      return RepeatStatus.FINISHED;
   }
}
Here is the .jsp file so from here we will call the controller so it will start your job based on whatever request you want to proceed.
<html>
   <head>
     https://code.jquery.com/jquery-1.12.4.min.js

       $(function() {
         $("#executeManually").click(function() {
           var data = { "job" : "executeTasklet" };
           $.ajax({
             type : "POST",
             datatype : "json",
             url : "/SpringMVC/job/joblauncher",
             contentType : "application/json;
             charset=utf-8",
             data : JSON.stringify(data),
             success : function(data, textStatus) {
               alert("executing");
             },
             statusCode : {
               901 : function() {
                 window.location.href = window.location.href;
               }
             }
         });
       });
     });

   </head>
   <body>
     <a href="javascript:void(0);" id="executeManually">Execute Manually</a>
   </body>
</html>
When you click on Execute Manually button it will call JobLauncherController and start executing job so do whatever operation you want to perform
execute directly using the command
-Dmaven.tomcat.port=8080 tomcat:run
 jquery request params will contains time and job name – {time=1441533491828, job=executeTasklet}
 Here is the log

You can download code from GitHub Spring Web
that’s it. if you want to live demo then please watch below video
Thanks for reading 🙂
Please Subscribe our you tube channel Almighty Java
