Internationalization (i18n) and Localization (L10n) in Spring MVC

Add beans in applicationContext.xml or in spring-servlet.xml file

<bean id="messageSource" class="org.springframework.context.support.ResourceBundleMessageSource"  p:basenames="messages"/> 
<!-- http://localhost:9090/springweb/?locale=en --> 
<!-- http://localhost:9090/springweb/?locale=es -->    
<mvc:interceptors>            
     <bean class="org.springframework.web.servlet.i18n.LocaleChangeInterceptor" p:paramName="locale" />    
</mvc:interceptors>        
<bean id="localeResolver" class="org.springframework.web.servlet.i18n.SessionLocaleResolver" />

Now you just need to add messages_**.properties files in resources folder

messages_en.properties

welcome.message=Welcome Page
legend.login=Login

label.new.user=New User
label.login=Login
label.user=User
label.users=Users
label.userId=User Id
label.userName=User Name
label.password=password
label.home=Home

label.save=Save
label.list=List
label.add=Add
label.edit=Edit
label.delete=Delete

placeholder.userId=Enter User Id
placeholder.userName=Enter User Name
placeholder.password=Enter Password

messages_es.properties

welcome.message=Pagina de

label.new.user=Nuevo usuario
label.login=Iniciar sesión
label.user=Usuario
label.users=Usuarios
label.userId=Identidad de usuario
label.userName=Nombre de usuario
label.password=contraseña
label.home=Casa

label.save=Salvar
label.list=Lista
label.add=Añadir
label.edit=Editar
label.delete=Borrar

placeholder.userId=Introduzca el ID de usuario
placeholder.userName=Introduzca su nombre de usuario
placeholder.password=Introducir la contraseña

That’s it so you can create different links to convert the language or hit the respected URL and localization takes care of automatically.

If you feel any difficulty then download the code from Git

If you want to see live demo then watch below videos

Thanks for reading 🙂

Please Subscribe our you tube channel Almighty Java

How to integrate Ehcache with Spring MVC?

What is Ehcache?

Ehcache is an open source, a standards-based cache that boosts performance, offloads your database, and simplifies scalability. It’s the most widely-used Java-based cache because it’s robust, proven, full-featured, and integrates with other popular libraries and frameworks.

For more details visit link

Ehcache

Follow below steps to integrate Ehcache with Spring –

Step 1 – Add the dependency in pom.xml file

<dependency> 
      <groupId>net.sf.ehcache</groupId> 
      <artifactId>ehcache-core</artifactId> 
      <version>2.6.9</version> 
</dependency>

Step 2 – Create separate XML file for cache and create beans for cacheManager and ehCache

<?xml version="1.0" encoding="UTF-8"?>
<beans xmlns="http://www.springframework.org/schema/beans" 
     xmlns:p="http://www.springframework.org/schema/p" 
     xmlns:cache="http://www.springframework.org/schema/cache" 
     xmlns:xsi="http://www.w3.org/2001/XMLSchema-instance" 
     xsi:schemaLocation="http://www.springframework.org/schema/beans  
     http://www.springframework.org/schema/beans/spring-beans.xsd 
     http://www.springframework.org/schema/cache  
     http://www.springframework.org/schema/cache/spring-cache.xsd">
     <cache:annotation-driven/> 
     <bean id="cacheManager" class="org.springframework.cache.ehcache.EhCacheCacheManager"> 
         <property name="cacheManager" ref="ehcache" /> 
     </bean>
     <bean id="ehcache" class="org.springframework.cache.ehcache.EhCacheManagerFactoryBean"> 
         <property name="configLocation" value="classpath:cache/ehcache.xml" /> 
     </bean>
</beans>

Step 3 – Create ehcache.xml file under cache directory

<?xml version="1.0" encoding="UTF-8"?>
<ehcache xmlns:xsi="http://www.w3.org/2001/XMLSchema-instance" 
     xsi:noNamespaceSchemaLocation="http://ehcache.org/ehcache.xsd" 
     updateCheck="true" monitoring="autodetect" dynamicConfig="true"> 
     <cache name="users" 
            maxEntriesLocalHeap="5000" 
            maxEntriesLocalDisk="1000" 
            eternal="false" 
            diskSpoolBufferSizeMB="20" 
            timeToIdleSeconds="200" 
            timeToLiveSeconds="500" 
            memoryStoreEvictionPolicy="LFU" 
            transactionalMode="off"> 
            <persistence strategy="localTempSwap" /> 
     </cache>
</ehcache>

Step 4 – Use @Cacheable with the proper cache name

@Cacheable(value="users") 
public List<User> userList() { 
     return userDao.findAll(); 
}

You can download code from GitHub Spring Web

that’s it. if you want to live demo then please watch below video

Thanks for reading 🙂

Please Subscribe our you tube channel Almighty Java


How to Execute Spring Batch Manually?

 What is Spring Batch?

  • A lightweight, comprehensive batch framework designed to enable the development of robust batch applications vital for the daily operations of enterprise systems.
  • Spring Batch provides reusable functions that are essential in processing large volumes of records, including logging/tracing, transaction management, job processing statistics, job restart, skip, and resource management.
  • It also provides more advanced technical services and features that will enable extremely high-volume and high-performance batch jobs through optimization and partitioning techniques.
  • Simple as well as complex, high-volume batch jobs can leverage the framework in a highly scalable manner to process significant volumes of information.

Features

  • Transaction management
  • Chunk-based processing
  • Declarative I/O
  • Start/Stop/Restart
  • Retry/Skip
  • Web-based administration interface (Spring Batch Admin)

How to execute Spring Batch Manually?

  • The Job Tier is responsible for the overall execution of a batch job.
  • It sequentially executes batch steps, ensuring that all steps are in the correct state and all appropriate policies are enforced.
  • The job tier is entirely concerned with maintaining the three job stereotypes: Job, JobInstance, and JobExecution.
  • The JobLauncher interacts with the JobRepository in order to create a JobExecution, and the Job stores the JobExecution using the repository.

What is Job Repository?

  • Job Repository is responsible for the persistence of batch meta-data entities.
  • SimpleJobRepository is the implementation of JobRepository that stores JobInstances, JobExecutions, and StepExecutions using the injected DAOs.
  • A FactoryBean (MapJobRepositoryFactoryBean) that automates the creation of a SimpleJobRepository using non-persistent in-memory DAO implementations.
  • This repository is only really intended for use in testing and rapid prototyping. In such settings, you might find that ResourcelessTransactionManager is useful (as long as your business logic does not use a relational database).
  • Not suited for use in multithreaded jobs with splits, although it should be safe to use in a multi-threaded step.

What is Job Launcher?

  • Simple interface for controlling jobs, including possible ad-hoc executions, based on different runtime identifiers.
  • It is extremely important to note that this interface makes absolutely no guarantees about whether or not calls to it are executed synchronously or asynchronously.
  • A simple implementation of the JobLauncher interface. The Spring Core TaskExecutor interface is used to launch a Job.
  • This means that the type of executor set is very important. If a SyncTaskExecutor is used, then the job will be processed within the same thread that called the launcher.
  • Care should be taken to ensure any users of this class understand fully whether or not the implementation of TaskExecutor used will start tasks synchronously or asynchronously.
  • The default setting uses asynchronous task executor. There is only one required dependency of this Launcher, a JobRepository. The JobRepository is used to obtain a valid JobExecution.
  • The Repository must be used because the provided Job could be a restart of an existing JobInstance, and only the Repository can reliably recreate it.

What is Job Registry and Registry bean post processor?

  • A runtime service registry interfaces for registering job configurations by name.
  • MapJobRegistry is a Simple, thread-safe, map-based implementation of JobRegistry.
  • A BeanPostProcessor that registers Job beans with a JobRegistry. Include a bean of this type along with your job configuration, and use the same JobRegistry as a JobLocator when you need to locate a Job to launch.

What is Tasklet in Spring?

  • It is a strategy for processing in a step.
  • Declares the implementation of the Tasklet strategy indirectly by configuring a chunk or directly by configuring a reference to the Tasklet interface.
  • Given the current context in the form of a step contribution, do whatever is necessary to process this unit inside a transaction.
  • Implementations return RepeatStatus.FINISHED if finished.
  • If not they return RepeatStatus.CONTINUABLE. On failure throws an exception.

Let’s Implement

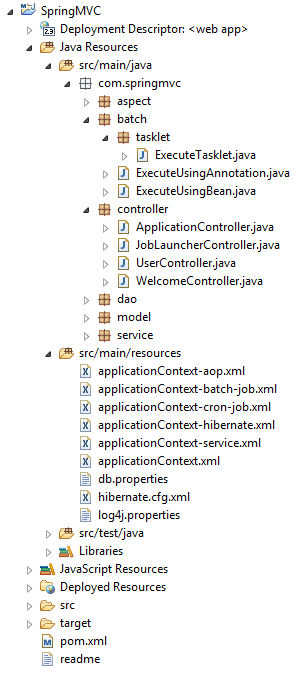
Project structure be like below image

batch

pom.xml

<!-- Spring Batch dependency -->
<dependency>
      <groupId>org.springframework.batch</groupId>
      <artifactId>spring-batch-core</artifactId>
      <version>3.0.3.RELEASE</version>
</dependency>

applicationContext-batch-job.xml

<?xml version="1.0" encoding="UTF-8"?>
<beans xmlns="http://www.springframework.org/schema/beans" 
      xmlns:batch="http://www.springframework.org/schema/batch"  
      xmlns:task="http://www.springframework.org/schema/task" 
      xmlns:xsi="http://www.w3.org/2001/XMLSchema-instance" 
      xsi:schemaLocation="http://www.springframework.org/schema/beans  
      http://www.springframework.org/schema/beans/spring-beans.xsd 
      http://www.springframework.org/schema/task        
      http://www.springframework.org/schema/task/spring-task.xsd        
      http://www.springframework.org/schema/batch  
      http://www.springframework.org/schema/batch/spring-batch.xsd">
      <bean id="transactionManager" class="org.springframework.batch.support.transaction.ResourcelessTransactionManager" />
      <bean id="jobRepository" class="org.springframework.batch.core.repository.support.MapJobRepositoryFactoryBean"> 
            <property name="transactionManager" ref="transactionManager" /> 
      </bean>
      <bean id="jobLauncher" class="org.springframework.batch.core.launch.support.SimpleJobLauncher"> 
            <property name="jobRepository" ref="jobRepository" /> 
      </bean>
      <bean id="jobRegistry" class="org.springframework.batch.core.configuration.support.MapJobRegistry" />
      <bean class="org.springframework.batch.core.configuration.support.JobRegistryBeanPostProcessor"> 
            <property name="jobRegistry" ref="jobRegistry" /> 
      </bean>
      <batch:job id="executeTasklet"> 
            <batch:step id="trackParamsRuleStep"> 
                  <batch:tasklet> 
                        <bean class="com.springmvc.batch.tasklet.ExecuteTasklet"> 
                              <property name="params" ref="params" /> 
                        </bean> 
                  </batch:tasklet> 
            </batch:step> 
      </batch:job>
      <bean id="params" class="java.util.HashMap" />
</beans>

JobLauncherController.java

package com.springmvc.controller;
import org.codehaus.jettison.json.JSONObject;
import org.springframework.batch.core.JobParametersBuilder;
import org.springframework.batch.core.configuration.JobRegistry;
import org.springframework.batch.core.launch.JobLauncher;
import org.springframework.beans.factory.annotation.Autowired;
import org.springframework.http.HttpStatus;
import org.springframework.http.MediaType;
import org.springframework.stereotype.Controller;
import org.springframework.web.bind.annotation.RequestBody;
import org.springframework.web.bind.annotation.RequestMapping;
import org.springframework.web.bind.annotation.RequestMethod;
import org.springframework.web.bind.annotation.ResponseStatus;
@Controller@RequestMapping(value = "/job")
public class JobLauncherController { 
     private static final String TIME = "time"; 
     private static final String JOB_PARAM = "job";

     @Autowired 
     private JobLauncher jobLauncher; 
     @Autowired 
     private JobRegistry jobRegistry;

     @RequestMapping(value = "/joblauncher", method = RequestMethod.POST, consumes = MediaType.APPLICATION_JSON_VALUE) 
     @ResponseStatus(HttpStatus.ACCEPTED) 
     public void launchJob(@RequestBody String info) throws Exception { 
        JSONObject parseJson = new JSONObject(info); 
        JobParametersBuilder builder = extractParameters(parseJson); 
        jobLauncher.run(jobRegistry.getJob(parseJson.getString(JOB_PARAM)), builder.toJobParameters()); 
     }

     private JobParametersBuilder extractParameters(JSONObject parseJson) throws Exception { 
          JobParametersBuilder builder = new JobParametersBuilder(); 
          builder.addLong(TIME, System.currentTimeMillis()).toJobParameters(); 
          builder.addString(JOB_PARAM, parseJson.getString(JOB_PARAM)); 
          return builder; 
     }
}

ExecuteTasklet.java

package com.springmvc.batch.tasklet;
import java.util.Map;
import org.springframework.batch.core.StepContribution;
import org.springframework.batch.core.scope.context.ChunkContext;
import org.springframework.batch.core.step.tasklet.Tasklet;
import org.springframework.batch.repeat.RepeatStatus;
public class ExecuteTasklet implements Tasklet { 
   private Map<Object,String> params;

   public Map<Object,String> getParams() { 
      return params; 
   }
   public void setParams(Map<Object,String> params) { 
      this.params = params;  
   }
   public RepeatStatus execute(StepContribution contribution, ChunkContext chunkContext) throws Exception { 
      Map<?,?> jobParameters = chunkContext.getStepContext().getJobParameters(); params.clear(); 
      for (Map.Entry<?,?> entry : jobParameters.entrySet()) { 
         params.put(entry.getKey(), entry.getValue().toString()); 
      } 
      System.out.println("running job " + params); 
      return RepeatStatus.FINISHED; 
   }
}

Here is the .jsp file so from here we will call the controller so it will start your job based on whatever request you want to proceed.

<html>
   <head> 
     https://code.jquery.com/jquery-1.12.4.min.js 
      
       $(function() { 
         $("#executeManually").click(function() { 
           var data = { "job" : "executeTasklet" }; 
           $.ajax({ 
             type : "POST", 
             datatype : "json", 
             url : "/SpringMVC/job/joblauncher", 
             contentType : "application/json; 
             charset=utf-8", 
             data : JSON.stringify(data), 
             success : function(data, textStatus) { 
               alert("executing"); 
             }, 
             statusCode : { 
               901 : function() { 
                 window.location.href = window.location.href; 
               } 
             } 
         }); 
       }); 
     }); 
   
   </head>
   <body> 
     <a href="javascript:void(0);" id="executeManually">Execute Manually</a>
   </body>
</html>

When you click on Execute Manually button it will call JobLauncherController and start executing job so do whatever operation you want to perform

execute directly using the command

-Dmaven.tomcat.port=8080 tomcat:run

jspjquery request params will contains time and job name – {time=1441533491828, job=executeTasklet}

jsp2Here is the log

log

You can download code from GitHub Spring Web

that’s it. if you want to live demo then please watch below video

Thanks for reading 🙂

Please Subscribe our you tube channel Almighty Java

How to integrate Quartz scheduler in Spring?

Quartz is a full-featured, open source job scheduling system that can be used from smallest apps to large scale enterprise systems.

What is the Quartz Job Scheduling Library?

Quartz is a richly featured, open source job scheduling library that can be integrated within virtually any Java application – from the smallest stand-alone application to the largest e-commerce system. Quartz can be used to create simple or complex schedules for executing tens, hundreds, or even tens-of-thousands of jobs; jobs whose tasks are defined as standard Java components that may execute virtually anything you may program them to do. The Quartz Scheduler includes many enterprise-class features, such as support for JTA transactions and clustering.

Quartz is freely usable, licensed under the Apache 2.0 license.

Follow below steps to integrate Quartz with Spring MVC.

Step 1 – Need to add dependencies to pom.xml file

<dependency>
  <groupId>org.springframework</groupId>
  <artifactId>spring-context-support</artifactId>
  <version>4.3.3.RELEASE</version>
</dependency>
<dependency>
  <groupId>org.quartz-scheduler</groupId>
  <artifactId>quartz</artifactId>
  <version>2.2.1</version>
</dependency>

Step 2 – creates a separate XML file for quartz “spring-quartz.xml” and yes it not necessary.

<?xml version="1.0" encoding="UTF-8"?>
<beans xmlns="http://www.springframework.org/schema/beans"
 xmlns:p="http://www.springframework.org/schema/p"
 xmlns:context="http://www.springframework.org/schema/context"
 xmlns:xsi="http://www.w3.org/2001/XMLSchema-instance"
 xsi:schemaLocation="http://www.springframework.org/schema/beans
         http://www.springframework.org/schema/beans/spring-beans.xsd
         http://www.springframework.org/schema/context
         http://www.springframework.org/schema/context/spring-context.xsd">
<bean id="quartzJob" class="com.mightyjava.quartz.ExecuteUsingQuartz"/>
<bean id="jobFactoryBean" class="org.springframework.scheduling.quartz.MethodInvokingJobDetailFactoryBean"
       p:targetObject-ref="quartzJob" p:targetMethod="run"/>
<bean id="triggerFactoryBean" class="org.springframework.scheduling.quartz.CronTriggerFactoryBean"
       p:jobDetail-ref="jobFactoryBean" p:cronExpression="0/5 * * * * ?"/>
<bean class="org.springframework.scheduling.quartz.SchedulerFactoryBean"
       p:triggers-ref="triggerFactoryBean"/>
</beans>

Step 3 – create a class where logic will stay

package com.mightyjava.quartz;
import java.util.Date;
public class ExecuteUsingQuartz {
   public void run() {
      System.out.println("Executing using quartz in every 15 seconds " + new Date());
   }
}

that’s it. if you want to live demo then please watch below video

Thanks for reading 🙂

Please Subscribe our you tube channel Almighty Java

How to execute cron job in Spring ?

Spring framework has built-in support for scheduled tasks. So can schedule tasks using XML as well as annotation also.

XML

<task:scheduled-tasks>
     <task:scheduled ref="beanName" method="methodName" cron="*/5 * * * * *"/>
</task:scheduled-tasks>

Annotation – An annotation that marks a method to be scheduled. Exactly one of the cron(), fixedDelay(), or fixedRate() attributes must be specified.

Processing of @Scheduled annotations is performed by registering a ScheduledAnnotationBeanPostProcessor. This can be done manually or, more conveniently, through the <task:annotation-driven/> element or @EnableScheduling annotation.

@Scheduled(cron=“0/10 * * * * *”) //execute after every 10 seconds

For more detail, Please watch below video –

Thanks for reading 🙂

Please Subscribe our you tube channel Almighty Java

What is Spring data JPA ?

  • The too much boilerplate code has to be written to execute simple queries as well as perform pagination, and auditing.
  • It aims to significantly improve the implementation of data access layers by reducing the effort to the amount that’s actually needed.
  • As a developer, you write your repository interfaces, including custom finder methods, and Spring will provide the implementation automatically.
  • We can remove some boilerplate code by creating an abstract base repository class that provides CRUD operations for our entities. This means that we can create concrete repositories by extending that base repository class.
  • It has a lot of customization points, including items like query auto-generation by convention, query hints, and auditing.

Features

  • Sophisticated support to build repositories based on Spring and JPA
  • Support for Querydsl predicates and thus type-safe JPA queries
  • Transparent auditing of domain class
  • Pagination support, dynamic query execution, ability to integrate custom data access code
  • Validation of @Query annotated queries at bootstrap time
  • Support for XML based entity mapping
  • JavaConfig based repository configuration by introducing @EnableJpaRepositories.

Advantages

  • Don’t need to write persisting, updating, deleting or searching logic.
  • Reduce a lot of basic DB code.
  • No need to create implementation classes to perform basic CRUD operations.
  • Just extends Repository class and it takes the domain class to manage as well as the id type of domain class as type arguments in Interface.
  • The interface acts as a marker interface to capture the type of work and to help you to discover interfaces that extend this one.

Types of Repositories

public interface Repository public interface CRUDRepository
public interface PagingAndSortingRepository
public interface JpaRepository

For more detail, Please watch below video –

Thanks for reading 🙂

Please Subscribe our you tube channel Almighty Java


What is Entity Manager in Hibernate ?

  • Hibernate Entity Manager implements the programming interfaces and lifecycle rules as defined by the JPA 2.0 specification.
  • Together with Hibernate Annotations, this wrapper implements a complete (and standalone) JPA persistence solution on top of the mature Hibernate Core.
  • The Entity Manager API is used to access a database in a particular unit of work. This interface is similar to the Session in Hibernate.
  • It is used to create and remove persistent entity instances, to find entities by their primary key identity, and to query over all entities.
<!– Need to use below dependency in pom.xml file to integrate entity manager -->
<dependency>
    <groupId>org.hibernate</groupId>
    <artifactId>hibernate-entitymanager</artifactId>
    <version>5.2.5.Final</version>
</dependency>

What is Entity Manager Factory?

  • An entity manager factory provides entity manager instances, all instances are configured to connect to the same database, to use the same default settings as defined by the particular implementation, etc.
  • Interface used to interact with the entity manager factory for the persistence unit. When the application has finished using the entity manager factory, and/or at application shutdown, the application should close the entity manager factory.
  • You can prepare several entity manager factories to access several data stores. This interface is similar to the Session Factory in native Hibernate.

What is Local Container Entity Manager Factory Bean? 

  • FactoryBean that creates a JPA EntityManagerFactory according to JPA’s standard container bootstrap contract.
  • This is the most powerful way to set up a shared JPA EntityManagerFactory in a Spring application context.
  • The EntityManagerFactory can then be passed to JPA-based DAOs via dependency injection.
  • Note that switching to a JNDI lookup or to a LocalEntityManagerFactoryBean definition is just a matter of configuration.

What is Persistence context?

  • The scope of this context can either be the transaction, or an extended unit of work.
  • Entities are managed by javax.persistence.EntityManager instance using persistence context.
  • Each EntityManager instance is associated with a persistence context.
  • Within the persistence context, the entity instances and their lifecycle are managed.
  • Persistence context defines a scope under which particular entity instances are created, persisted, and removed.
  • A persistence context is like a cache which contains a set of persistent entities, So once the transaction is finished, all persistent objects are detached from the EntityManager’s persistence context and are no longer managed.

What is HibernateJpaVendorAdapter?

  • JpaVendorAdapter implementation for Hibernate EntityManager.
  • Its kind of one property of EntityManager and contains some configuration like generate DDL, show SQL, format SQL etc.
<!-- Entity Manager Factory -->
<bean id="entityManagerFactory" class="org.springframework.orm.jpa.LocalContainerEntityManagerFactoryBean" p:dataSource-ref="dataSource" p:packagesToScan="com.mightyjava.model">
   <property name="jpaVendorAdapter">
       <bean class="org.springframework.orm.jpa.vendor.HibernateJpaVendorAdapter" p:showSql="true" p:generateDdl="true"/>
   </property>
</bean>  

What is JpaTransactionManager?

  • This transaction manager is appropriate for applications that use a single JPA EntityManagerFactory for transactional data access.
  • JTA (usually through JtaTransactionManager) is necessary for accessing multiple transactional resources within the same transaction.
  • This transaction manager also supports direct DataSource access within a transaction.
<!-- Transaction -->
<bean id="transactionManager" class="org.springframework.orm.jpa.JpaTransactionManager" p:entityManagerFactory-ref="entityManagerFactory" />

For more detail, Please watch below video –

Thanks for reading 🙂

Please Subscribe our you tube channel Almighty Java

What is “p” namespace ?

  • Spring’s “p” name space is an alternative to using the property tag.
  • Using “p” namespace, we can perform dependency injection by directly using the attribute of bean tag instead of using the property.
  • “p” namespace is more compact than property tag.
  • Using “p” namespace reduces the amount of XML required in Spring configuration.
  • The size of spring configuration using p namespace is typically less than one with using property tag.
xmlns:p="http://www.springframework.org/schema/p"

For more detail, Please watch below video –


Thanks for reading 🙂

Please Subscribe our you tube channel Almighty Java

What is Hibernate ?

  • It is an object-relational mapping(ORM) framework for the Java language.
  • It provides a framework for mapping an object-oriented domain model to a relational database.
  • It solves object-relational impedance mismatch problems by replacing direct, persistent database accesses with high-level object handling functions.
  • Its primary feature is mapping from Java classes to database tables, and mapping from Java data types to SQL data types.
  • It also provides data query and retrieval facilities. It generates SQL calls and relieves the developer from manual handling and object conversion of the result set.

What is Session Factory?

  • SessionFactory is an interface and extends Referenceable, Serializable and which is available in “org.hibernate” package.
  • Creates Sessions, Usually, an application has a single SessionFactory and it is long live multithreaded object so can say it’s a thread safe.
  • Usually, one session factory should be created for one database so if have multiple databases then multiple session factories required.
  • SessionFactorys are immutable. The behavior of a SessionFactory is controlled by properties supplied at configuration time. These properties are defined on Environment.
Configuration config = new Configuration();
config.configure(“hibernate.cfg.xml”);
SessionFactory sessionFactory = config.buildSessionFactory();

What is Session?

  • A Session is used to get a physical connection with a database.
  • The Session object is lightweight and designed to be instantiated each time an interaction is needed with the database. Persistent objects are saved and retrieved through a Session object.
  • The session is not Thread Safe.
  • Sessions are opened by a SessionFactory and then are closed when all work is complete.
  • A session obtains a database connection lazily (i.e. only when required). To avoid creating too many sessions.
SessionFactory sessionFactory = config.builedSessionFactory();
Session session = sessionFactory.getCurrentSession();

What is Data source?

  • Spring obtains a connection to the database through a DataSource.
  • A DataSource is part of the JDBC specification and is a generalized connection factory.
  • It allows a container or a framework to hide connection pooling and transaction management issues from the application code.
<bean id="dataSource" class="org.apache.commons.dbcp.BasicDataSource">
    <property name="url" value=“jdbc:mysql://localhost:3306/db_name" />
    <property name="driverClassName" value=“com.mysql.jdbc.Driver" />
    <property name="username" value=“root" />
    <property name="password" value=“root" />
</bean>

For more detail, Please watch below video –

Thanks for reading 🙂

Please Subscribe our you tube channel Almighty Java

What is mvc:annotation-driven?

  • Spring 3 introduces an MVC XML configuration namespace that simplifies the setup of Spring MVC inside your web application.
  • If you don’t include mvc:annotation-driven also your MVC application would work if you have used the context:component-scan for creating the beans or defined the beans in your XML file.
  • mvc:annotation-driven does some extra job on configuring the special beans that would not have been configured if you are not using this element in your XML file.
  • This tag would register the HandlerMapping and HandlerAdapter required to dispatch requests to your @Controllers.

For more detail, Please watch below video –

Thanks for reading 🙂

Please Subscribe our you tube channel Almighty Java